Section 4.10.5
The Rainbow

The rainbow feature can be used to create rainbows and maybe other more strange effects. The rainbow is a fog like effect that is restricted to a cone-like volume.

Section 4.10.5.1
Starting With a Simple Rainbow

The rainbow is specified with a lot of parameters: the angle under which it is visible, the width of the color band, the direction of the incoming light, the fog-like distance based particle density and last not least the color map to be used.

The size and shape of the rainbow are determined by the angle and width keywords. The direction keyword is used to set the direction of the incoming light, thus setting the rainbow's position. The rainbow is visible when the angle between the direction vector and the incident light direction is larger than angle-width/2 and smaller than angle+width/2.

The incoming light is the virtual light source that is responsible for the rainbow. There needn't be a real light source to create the rainbow effect.

The rainbow is a fog-like effect, i.e. the rainbow's color is mixed with the background color based on the distance to the intersection point. If you choose small distance values the rainbow will be visible on objects, not just in the background. You can avoid this by using a very large distance value.

The color map is the crucial part of the rainbow since it contains all the colors that normally can be seen in a rainbow. The color of the innermost color band is taken from the color map entry 0 while the outermost band is take from entry 1. You should note that due to the limited color range any monitor can display it is impossible to create a real rainbow. There are just some colors that you cannot display.

The filter channel of the rainbow's color map is used in the same way as with fogs. It determines how much of the light passing through the rainbow is filtered by the color.

The following example shows a simple scene with a ground plane, three spheres and a somewhat exaggerated rainbow (rainbow1.pov).

#include "colors.inc" camera { location <0, 20, -100> look_at <0, 25, 0> angle 80 } background { color SkyBlue } plane { y, -10 pigment { colour Green } } light_source {<100, 120, 40> colour White} // declare rainbow's colours #declare r_violet1 = colour rgbf<1.0, 0.5, 1.0, 1.0> #declare r_violet2 = colour rgbf<1.0, 0.5, 1.0, 0.8> #declare r_indigo = colour rgbf<0.5, 0.5, 1.0, 0.8> #declare r_blue = colour rgbf<0.2, 0.2, 1.0, 0.8> #declare r_cyan = colour rgbf<0.2, 1.0, 1.0, 0.8> #declare r_green = colour rgbf<0.2, 1.0, 0.2, 0.8> #declare r_yellow = colour rgbf<1.0, 1.0, 0.2, 0.8> #declare r_orange = colour rgbf<1.0, 0.5, 0.2, 0.8> #declare r_red1 = colour rgbf<1.0, 0.2, 0.2, 0.8> #declare r_red2 = colour rgbf<1.0, 0.2, 0.2, 1.0> // create the rainbow rainbow { angle 42.5 width 5 distance 1.0e7 direction <-0.2, -0.2, 1> jitter 0.01 colour_map { [0.000 colour r_violet1] [0.100 colour r_violet2] [0.214 colour r_indigo] [0.328 colour r_blue] [0.442 colour r_cyan] [0.556 colour r_green] [0.670 colour r_yellow] [0.784 colour r_orange] [0.900 colour r_red1] } }

Some irregularity is added to the color bands using the jitter keyword.


A colorful rainbow.

The rainbow in our sample is much too bright. You'll never see a rainbow like this in reality. You can decrease the rainbow's colors by decreasing the RGB values in the color map.


Section 4.10.5.2
Increasing the Rainbow's Translucency

The result we have so far looks much too bright. Just reducing the rainbow's color helps but it's much better to increase the translucency of the rainbow because it is more realistic if the background is visible through the rainbow.

We can use the transmittance channel of the colors in the color map to specify a minimum translucency, just like we did with the fog. To get realistic results we have to use very large transmittance values as you can see in the following example (rainbow2.pov).

rainbow { angle 42.5 width 5 distance 1.0e7 direction <-0.2, -0.2, 1> jitter 0.01 colour_map { [0.000 colour r_violet1 transmit 0.98] [0.100 colour r_violet2 transmit 0.96] [0.214 colour r_indigo transmit 0.94] [0.328 colour r_blue transmit 0.92] [0.442 colour r_cyan transmit 0.90] [0.556 colour r_green transmit 0.92] [0.670 colour r_yellow transmit 0.94] [0.784 colour r_orange transmit 0.96] [0.900 colour r_red1 transmit 0.98] } }

The transmittance values increase at the outer bands of the rainbow to make it softly blend into the background.


A much more realistic rainbow.

The resulting image looks much more realistic than our first rainbow.


Section 4.10.5.3
Using a Rainbow Arc

Currently our rainbow has a circular shape, even though most of it is hidden below the ground plane. You can easily create a rainbow arc by using the arc_angle keyword with an angle below 360 degrees.

If you use arc_angle 120 for example you'll get a rainbow arc that abruptly vanishes at the arc's ends. This does not look good. To avoid this the falloff_angle keyword can be used to specify a region where the arc smoothly blends into the background.

As explained in the rainbow's reference section (see "Rainbow") the arc extends from -arc_angle/2 to arc_angle/2 while the blending takes place from -arc_angle/2 to -falloff_angle/2 and falloff_angle/2 to arc_angle/2. This is the reason why the falloff_angle has to be smaller or equal to the arc_angle.

In the following examples we use an 120 degrees arc with a 45 degree falloff region on both sides of the arc (rainbow3.pov).

rainbow { angle 42.5 width 5 arc_angle 120 falloff_angle 30 distance 1.0e7 direction <-0.2, -0.2, 1> jitter 0.01 colour_map { [0.000 colour r_violet1 transmit 0.98] [0.100 colour r_violet2 transmit 0.96] [0.214 colour r_indigo transmit 0.94] [0.328 colour r_blue transmit 0.92] [0.442 colour r_cyan transmit 0.90] [0.556 colour r_green transmit 0.92] [0.670 colour r_yellow transmit 0.94] [0.784 colour r_orange transmit 0.96] [0.900 colour r_red1 transmit 0.98] } }

The arc angles are measured against the rainbows up direction which can be specified using the up keyword. By default the up direction is the y-axis.


A rainbow arc.

We finally have a realistic looking rainbow arc.


Section 4.10.6
Animation

There are a number of programs available that will take a series of still TGA files (such as POV-Ray outputs) and assemble them into animations. Such programs can produce AVI, MPEG, FLI/FLC, or even animated GIF files (for use on the World Wide Web). The trick, therefore, is how to produce the frames. That, of course, is where POV-Ray comes in. In earlier versions producing an animation series was no joy, as everything had to be done manually. We had to set the clock variable, and handle producing unique file names for each individual frame by hand. We could achieve some degree of automation by using batch files or similar scripting devices, but still, We had to set it all up by hand, and that was a lot of work (not to mention frustration... imagine forgetting to set the individual file names and coming back 24 hours later to find each frame had overwritten the last).

Now, at last, with POV-Ray 3, there is a better way. We no longer need a separate batch script or external sequencing programs, because a few simple settings in our INI file (or on the command line) will activate an internal animation sequence which will cause POV-Ray to automatically handle the animation loop details for us.

Actually, there are two halves to animation support: those settings we put in the INI file (or on the command line), and those code modifications we work into our scene description file. If we've already worked with animation in previous versions of POV-Ray, we can probably skip ahead to the section "INI File Settings" below. Otherwise, let's start with basics. Before we get to how to activate the internal animation loop, let's look at a couple examples of how a couple of keywords can set up our code to describe the motions of objects over time.
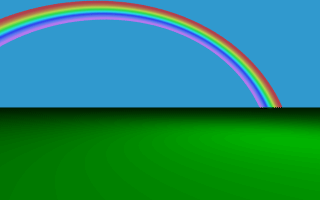

Next Section
Table Of Contents