Section 7.4.1
Type of Projection
Perspective projection: This projection represents the classic pinhole camera. The (horizontal) viewing angle is either determined by the ratio between the length of the direction vector and the length of the right vector or by the optional keyword angle, which is the preferred way. The viewing angle has to be larger than 0 degrees and smaller than 180 degrees. See the figure below for the geometry of the perspective camera.
Orthographic projection: This projection uses parallel camera rays to create an image of the scene. The size of the image is determined by the lengths of the right and up vectors.
If you add the orthographic keyword after all other parameters of a perspective camera you'll get an orthographic view with the same image area, i.e. the size of the image is the same. In this case you needn't specify the lengths of the right and up vector because they'll be calculated automatically. You should be aware though that the visible parts of the scene change when switching from perspective to orthographic view. As long as all objects of interest are near the look_at location they'll be still visible if the orthographic camera is used. Objects farther away may get out of view while nearer objects will stay in view.
Fisheye projection: This is a spherical projection. The viewing angle is specified by the angle keyword. An angle of 180 degrees creates the "standard" fisheye while an angle of 360 degrees creates a super-fisheye ("I-see-everything-view"). If you use this projection you should get a circular image. If this isn't the case, i.e. you get an elliptical image, you should read "Aspect Ratio".
Ultra wide angle projection: This projection is somewhat similar to the fisheye but it projects the image onto a rectangle instead of a circle. The viewing angle can be specified using the angle keyword.
Omnimax projection: The omnimax projection is a 180 degrees fisheye that has a reduced viewing angle in the vertical direction. In reality this projection is used to make movies that can be viewed in the dome-like Omnimax theaters. The image will look somewhat elliptical. The angle keyword isn't used with this projection.
Panoramic projection: This projection is called "cylindrical equirectangular projection". It overcomes the degeneration problem of the perspective projection if the viewing angle approaches 180 degrees. It uses a type of cylindrical projection to be able to use viewing angles larger than 180 degrees with a tolerable lateral-stretching distortion. The angle keyword is used to determine the viewing angle.
Cylindrical projection: Using this projection the scene is projected onto a cylinder. There are four different types of cylindrical projections depending on the orientation of the cylinder and the position of the viewpoint. The viewing angle and the length of the up or right vector determine the dimensions of the camera and the visible image. The camera to use is specified by a number. The types are:
If the perspective camera is used the angle keyword overrides the viewing angle specified by the direction keyword and vice versa. Each time angle is used the length of the direction vector is adjusted to fit the new viewing angle.
There is no limitation to the viewing angle except for the perspective projection. If you choose viewing angles larger than 360 degrees you'll see repeated images of the scene (the way the repetition takes place depends on the camera). This might be useful for special effects.
You should note that the vista buffer can only be used with the perspective and orthographic camera.
The aperture keyword determines the depth of the sharpness zone. Large apertures give a lot of blurring, while narrow apertures will give a wide zone of sharpness. Note that, while this behaves as a real camera does, the values for aperture are purely arbitrary and are not related to f-stops.
The center of the zone of sharpness is the focal_point vector (the default focal_point is <0,0,0>).
The blur_samples value controls the maximum number of rays to use for each pixel. More rays give a smoother appearance but is slower, although this is controlled somewhat by an adaptive mechanism that stops shooting rays when a certain degree of confidence has been reached that shooting more rays would not result in a significant change.
The confidence and variance keywords control the adaptive function. The confidence value is used to determine when the samples seem to be close enough to the correct color. The variance value specifies an acceptable tolerance on the variance of the samples taken so far. In other words, the process of shooting sample rays is terminated when the estimated color value is very likely (as controlled by the confidence probability) near the real color value.
Since the confidence is a probability its values can range from 0 to 1 (the default is 0.9, i. e. 90%). The value for the variance should be in the range of the smallest displayable color difference (the default is 1/128).
Larger confidence values will lead to more samples, slower traces and better images. The same holds for smaller variance thresholds.
By default no focal blur is used, i. e. the default aperture is 0 and the default number of samples is 0.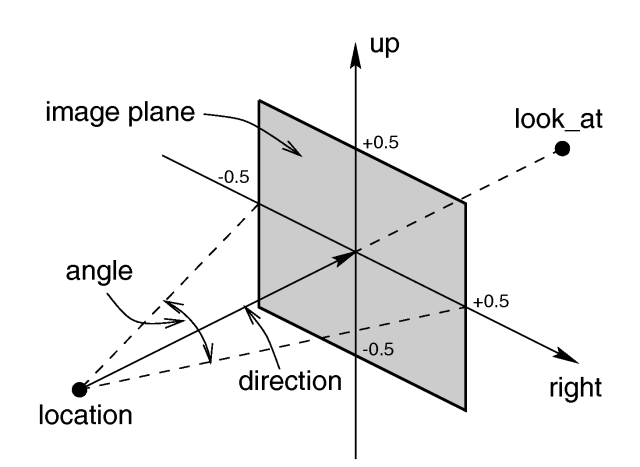
The perspective camera.
1 vertical cylinder, fixed viewpoint 2 horizontal cylinder, fixed viewpoint 3 vertical cylinder, viewpoint moves along the cylinder's axis 4 horizontal cylinder, viewpoint moves along the cylinder's axis
Section 7.4.2
Focal Blur
Table Of Contents