Isotropic scattering is the simplest form of scattering because it is independent of direction. The amount of light scattered by particles in the atmosphere does not depend on the angle between the viewing direction and the incoming light.
Rayleigh scattering models the scattering for extremely small particles such as molecules of the air. The amount of scattered light depends on the incident light angle. It is largest when the incident light is parallel or anti-parallel to the viewing direction and smallest when the incident light is perpendicular to the viewing direction. You should note that the Rayleigh model used in POV-Ray does not take the dependency of scattering on the wavelength into account.
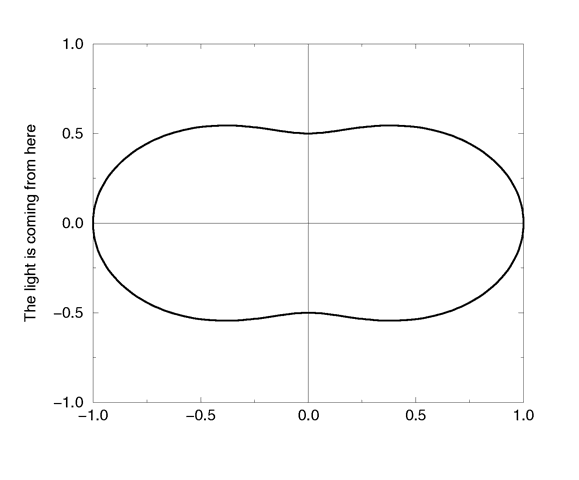
The Rayleigh scattering function.
Mie scattering is used for relatively small particles such as minuscule water droplets of fog, cloud particles, and particles responsible for the polluted sky. In this model the scattering is extremely directional in the forward direction i. e. the amount of scattered light is largest when the incident light is anti-parallel to the viewing direction (the light goes directly to the viewer). It is smallest when the incident light is parallel to the viewing direction. The haze and murky atmosphere models differ in their scattering characteristics. The murky model is much more directional than the haze model.
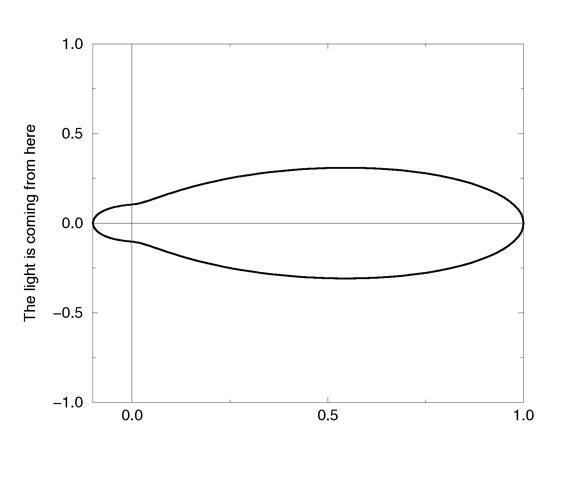
The Mie "haze" scattering function.
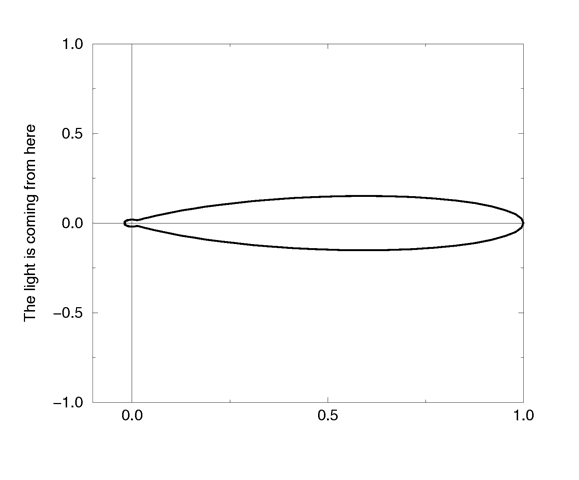
The Mie "murky" scattering function.
The Henyey-Greenstein scattering is based on an analytical function and can be used to model a large variety of different scattering types. The function models an ellipse with a given eccentricity e. This eccentricity is specified by the optional keyword eccentricity which is only used for scattering type five. An eccentricity value of zero defines isotropic scattering while positive values lead to scattering in the direction of the light and negative values lead to scattering in the opposite direction of the light. Larger values of e (or smaller values in the negative case) increase the directional property of the scattering.
The easiest way to use the different scattering types will be to declare some constants and use those in your atmosphere definition:
The distance keyword is used to determine the density of the particles in the atmosphere. This density is constant for the whole atmosphere. The distance parameter works in the same way as the fog distance.
With the scattering keyword you can change the amount of light that is scattered by the atmosphere, thus increasing or decreasing the brightness of the atmosphere. Smaller scattering values decrease the brightness while larger values increase it.
The colour or color keyword can be used to create a colored atmosphere, i. e. it can be used to get particles that filter the light passing through. The default color is black.
The light passing through the atmosphere (either coming from light sources or the background) is filtered by the atmosphere's color if the specified color has a non-zero filter value. In other words, the amount by which the light is filtered by the atmosphere's color is given by the filter value (pretty much in the same way as it is done for the fog). Using a color of rgbf <1,0,0,0.25> will result in a slightly reddish atmosphere because 25% of the light passing through the atmosphere is filtered by (multiplied with) the color of the atmosphere, i. e. rgb <1,0,0> (and that's red).
The transmittance channel of the atmosphere's color is used to specify a minimum translucency. If a value larger than zero is used you'll always see that amount of the background through the atmosphere, regardless of how dense the atmosphere is. This works in the same way as it does for fogs.
Since the atmosphere is calculated by sampling along the viewing ray and looking for contributions from light sources, it is prone to aliasing (just like any sampling technique). There are four parameters to minimize the artifacts that may be visible: samples, jitter, aa_level and aa_threshold.
The samples keyword determines how many samples are calculated in one interval along the viewing ray. The length of the interval is either the distance as given by the distance keyword or the length of the lit part of the viewing ray, whichever is smaller. This lit part is a section of the ray that is most likely lit by a light source. In the case of a spotlight it is the part of the ray that lies in the cone of light. In other cases it becomes more difficult. The only thing you should keep in mind is that the actual sampling interval length is variable but there will never be fewer than the specified samples in the specified distance.
One technique to reduce the visibility of sampling artifacts is to jitter the sample points, i. e. to add random noise to their location. This can be done with the jitter keyword.
Another technique is super-sampling (an anti-aliasing method). This helps to avoid missing features by adding additional samples in places were high intensity changes occur (e. g. the edge of a shadow). The anti-aliasing is turned on by the aa_level keyword. If this is larger than zero super-sampling will be used. The additional samples will be recursively placed between two samples with a high intensity change. The level to which subdivision takes places is specified by the aa_level keyword. Level one means one subdivision (one additional sample), level two means two subdivisions (up to three additional samples), etc.
The threshold for the intensity change is given by the aa_threshold keyword. If the intensity change is greater than this threshold anti-aliasing will be used for those two samples.
With spotlights you'll be able to create the best results because their cone of light will become visible. Pointlights can be used to create effects like street lights in fog. Lights can be made to not interact with the atmosphere by adding atmosphere off to the light source. They can be used to increase the overall light level off the scene to make it look more realistic.
You should note that the atmosphere feature will not work if the camera is inside a non-hollow object (see section "Empty and Solid Objects" for a detailed explanation).
The Heyney-Greenstein scattering function for different eccentricity values.
Table Of Contents