Section 4.10.1
The Background

The background feature is used to assign a color to all rays that don't hit any object. This is done in the following way.

camera { location <0, 0, -10> look_at <0, 0, 0> } background { color rgb <0.2, 0.2, 0.3> } sphere { 0, 1 pigment { color rgb <0.8, 0.5, 0.2> } }

The background color will be visible if a sky sphere is used and if some translucency remains after all sky sphere pigment layers are processed.


Section 4.10.2
The Sky Sphere

The sky sphere can be used to easily create a cloud covered sky, a nightly star sky or whatever sky you have in mind.

In the following examples we'll start with a very simple sky sphere that will get more and more complex as we add new features to it.


Section 4.10.2.1
Creating a Sky with a Color Gradient

Beside the single color sky sphere that is covered with the background feature the simplest sky sphere is a color gradient.

You may have noticed that the color of the sky varies with the angle to the earth's surface normal. If you look straight up the sky normally has a much deeper blue than it has at the horizon.

We want to model this effect using the sky sphere as shown in the scene below (skysph1.pov).

#include "colors.inc" camera { location <0, 1, -4> look_at <0, 2, 0> angle 80 } light_source { <10, 10, -10> White } sphere { 2*y, 1 pigment { color rgb <1, 1, 1> } finish { ambient 0.2 diffuse 0 reflection 0.6 } } sky_sphere { pigment { gradient y color_map { [0 color Red] [1 color Blue] } scale 2 translate -1 } }

The interesting part is the sky sphere statement. It contains a pigment that describe the look of the sky sphere. We want to create a color gradient along the viewing angle measured against the earth's surface normal. Since the ray direction vector is used to calculate the pigment colors we have to use the y-gradient.

The scale and translate transformation are used to map the points derived from the direction vector to the right range. Without those transformations the pattern would be repeated twice on the sky sphere. The scale statement is used to avoid the repetition and the translate -1 statement moves the color at index zero to the bottom of the sky sphere (that's the point of the sky sphere you'll see if you look straight down).

After this transformation the color entry at position 0 will be at the bottom of the sky sphere, i. e. below us, and the color at position 1 will be at the top, i. e. above us.

The colors for all other positions are interpolated between those two colors as you can see in the resulting image.
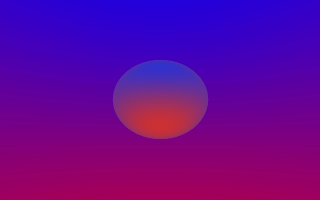

A simple gradient sky sphere.

If you want to start one of the colors at a specific angle you'll first have to convert the angle to a color map index. This is done by using the formula

  color_map_index = (1 - cos(angle)) / 2

where the angle is measured against the negated earth's surface normal. This is the surface normal pointing towards the center of the earth. An angle of 0 degrees describes the point below us while an angle of 180 degrees represents the zenith.

In POV-Ray you first have to convert the degree value to radian values as it is shown in the following example.

sky_sphere { pigment { gradient y color_map { [(1-cos(radians( 30)))/2 color Red] [(1-cos(radians(120)))/2 color Blue] } scale 2 translate -1 } }

This scene uses a color gradient that starts with a red color at 30 degrees and blends into the blue color at 120 degrees. Below 30 degrees everything is red while above 120 degrees all is blue.


Section 4.10.2.2
Adding the Sun

In the following example we will create a sky with a red sun surrounded by a red color halo that blends into the dark blue night sky. We'll do this using only the sky sphere feature.

The sky sphere we use is shown below. A ground plane is also added for greater realism (skysph2.pov).

sky_sphere { pigment { gradient y color_map { [0.000 0.002 color rgb <1.0, 0.2, 0.0> color rgb <1.0, 0.2, 0.0>] [0.002 0.200 color rgb <0.8, 0.1, 0.0> color rgb <0.2, 0.2, 0.3>] } scale 2 translate -1 } rotate -135*x } plane { y, 0 pigment { color Green } finish { ambient .3 diffuse .7 } }

The gradient pattern and the transformation inside the pigment are the same as in the example in the previous section.

The color map consists of three colors. A bright, slightly yellowish red that is used for the sun, a darker red for the halo and a dark blue for the night sky. The sun's color covers only a very small portion of the sky sphere because we don't want the sun to become too big. The color is used at the color map values 0.000 and 0.002 to get a sharp contrast at value 0.002 (we don't want the sun to blend into the sky). The darker red color used for the halo blends into the dark blue sky color from value 0.002 to 0.200. All values above 0.200 will reveal the dark blue sky.

The rotate -135*x statement is used to rotate the sun and the complete sky sphere to its final position. Without this rotation the sun would be at 0 degrees, i.e. right below us.
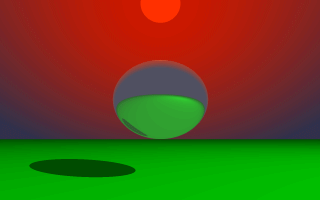

A red sun descends into the night.

Looking at the resulting image you'll see what impressive effects you can achieve with the sky sphere.


Section 4.10.2.3
Adding Some Clouds
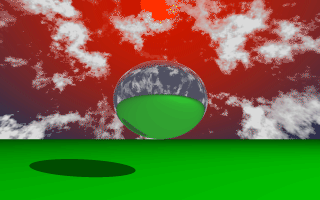
To further improve our image we want to add some clouds by adding a second pigment. This new pigment uses the bozo pattern to create some nice clouds. Since it lays on top of the other pigment it needs some translucent colors in the color map (look at entries 0.5 to 1.0).

sky_sphere { pigment { gradient y color_map { [0.000 0.002 color rgb <1.0, 0.2, 0.0> color rgb <1.0, 0.2, 0.0>] [0.002 0.200 color rgb <0.8, 0.1, 0.0> color rgb <0.2, 0.2, 0.3>] } scale 2 translate -1 } pigment { bozo turbulence 0.65 octaves 6 omega 0.7 lambda 2 color_map { [0.0 0.1 color rgb <0.85, 0.85, 0.85> color rgb <0.75, 0.75, 0.75>] [0.1 0.5 color rgb <0.75, 0.75, 0.75> color rgbt <1, 1, 1, 1>] [0.5 1.0 color rgbt <1, 1, 1, 1> color rgbt <1, 1, 1, 1>] } scale <0.2, 0.5, 0.2> } rotate -135*x }


A cloudy sky with a setting sun.

The sky sphere has one drawback as you might notice when looking at the final image (skysph3.pov). The sun doesn't emit any light and the clouds will not cast any shadows. If you want to have clouds that cast shadows you'll have to use a real, large sphere with an appropriate texture and a light source somewhere outside the sphere.


Section 4.10.3
The Fog

You can use the fog feature to add fog of two different types to your scene: constant fog and ground fog. The constant fog has a constant density everywhere while the ground fog's density decreases as you move upwards.

The usage of both fog types will be described in the next sections in detail.


Section 4.10.3.1
A Constant Fog

The simplest fog type is the constant fog that has a constant density in all locations. It is specified by a distance keyword which actually describes the fog's density and a fog color.

The distance value determines the distance at which 36.8% of the background are still visible (for a more detailed explanation of how the fog is calculated read the reference section "Fog").

The fog color can be used to create anything from a pure white to a red, blood-colored fog. You can also use a black fog to simulate the effect of a limited range of vision.

The following example will show you how to add fog to a simple scene (fog1.pov).
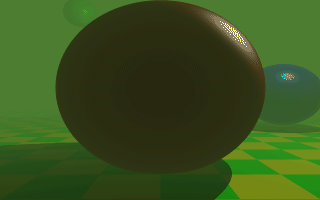
#include "colors.inc" camera { location <0, 20, -100> } background { colour SkyBlue } plane { y, -10 pigment { checker colour Yellow colour Green scale 20 } } sphere { <0, 25, 0>, 40 pigment { Red } finish { phong 1.0 phong_size 20 } } sphere { <-100, 150, 200>, 20 pigment { Green } finish { phong 1.0 phong_size 20 } } sphere { <100, 25, 100>, 30 pigment { Blue } finish { phong 1.0 phong_size 20 } } light_source { <100, 120, 40> colour White} fog { distance 150 colour rgb<0.3, 0.5, 0.2> }


A foggy scene.

According to their distance the spheres in this scene more or less vanish in the greenish fog we used, as does the checkerboard plane.


Next Section
Table Of Contents