
The halo is much brighter now.
Looking at the result of halo02.pov we see that the halo is indeed much brighter.
This is done by using the turbulence keyword together with the amount of turbulence we want to add. Just like in the following example.
Adding turbulence to the halo moves all points inside the halo container in a pseudo-random manner. This results in a particle distribution that looks like there was some kind of flow in the halo (depending on the amount of turbulence we'll get a laminar or turbulent flow). The high turbulence value is used because an explosion is highly turbulent.
Looking at the example image (halo03.pov) we'll see that this looks more like a fiery explosion than the glowing ball we got until now.
We notice that the time it took to render the image increased after we added the turbulence. This is due to the fact that for every sample taken from the halo the slow turbulence function has to be evaluated.
As noted above adding turbulence moves the particles inside the halo container around. The problem is that some of the particles are actually moved out of the container object. This leads to high densities at the surface of the container object revealing the shape of the object (all particles outside the container are lost and will not visible resulting in a large, highly visible density change at the surface).
An easy way of avoiding this is to make sure that the particles stay inside the container object even if we add some turbulence. This is done by scaling the halo to reduce its size. We do not scale the container object, just the halo.
This is done by adding the scale keyword inside the halo statement.
The scale 0.5 command tells POV-Ray to scale all points inside the halo by this amount. This effectively scales the radius we get after the density mapping to a range of 0 to 0.5 instead of 0 to 1 (without turbulence). If we now add the turbulence the points are allowed to move half a unit in every direction without leaving the container object. That is exactly what we want.
To compensate for the smaller halo we would get we scale the sphere (and the halo inside) by 1.5.
Looking at the new example image (halo04.pov) we will no longer see any signs of the container sphere. We finally have a nice fiery explosion.
The amount by which to scale the halo depends on the amount of turbulence we use. The higher the turbulence value the smaller the halo has to be scaled. That is something to experiment with.
Another way to avoid that points move out of the sphere is to use a larger sphere, i. e. a sphere with a radius larger than one. It is important to re-size the sphere before the halo is added because otherwise the halo will also be scaled.
We note that this only works for spherical and box mapping (and a non-constant density function). All other mapping types are (partially) infinite, i. e. the resulting particle distribution covers an infinite space (see also "Halo Mapping").
The rather mathematical explanation used there doesn't help much in understanding how this feature is used. It is quite simple though. The frequency value just tells the program how many times the color map will be repeated in the density range from 0 to 1. If a frequency of one (the default) is specified the color map will be visible once in the density field, e. g. the color at 0 will be used for density 0, color at 0.5 will be used for density 0.5 and the color at 1 will be used for density 1. Simple, isn't it?
If we choose a frequency of two, the color at 0 will be used for density 0, the color at 0.5 will be used for density 0.25 and the color at 1 will be used for density 0.5. What about the densities above 0.5? Since there are no entries in the color map for values above 1 we just start at 0 again. Thus the color at 0.1 will be used for density 0.55 ((2*0.55) mod 1 = 1.1 mod 1 = 0.1), the color at 0.5 will be used for density 0.75 and the color at 1 will be used for density 1.
If we are good at mathematics we'll note that the above example is not quite right because (1 * 2) mod 1 = 0 and not 1. We just think that we used a value slightly smaller than one and everything will be fine.
We may have noticed that in order to avoid sudden changes in the halo color for frequencies larger than one we'll have to used a periodic color map, i.e. a color map whose entries at 0 and 1 are the same.
We'll change our example by using a periodic color map and changing the frequency value to two.
Looking at the result of (halo05.pov) we can be quite satisfied with the explosion we just have created, can't we?
There's one thing left we should be aware of when increasing the frequency value. It is often necessary to increase the sample rate in (nearly) the same way as we change the frequency. If we don't do this we'll probably get some severe aliasing artifacts (like color jumps or strange bands of colors). If this happens just change the samples value according to the frequency value (twice sampling rate for a doubled frequency).
Nothing easier than that!
This should do the trick. Looking at the result of halo06.pov we may be disappointed. Where is the red center of the explosion? The borders are green as expected but there is a lot of yellow in the center and only a little bit red. What is happening?
We use an emitting halo in our example. According to the corresponding section in the halo reference chapter (see "Emitting") this type of halo uses very small particles that do not attenuate light passing through the halo. Especially particles near the viewer do not attenuate the light coming from particles far away from the viewer.
During the calculation of the halo's color near the center of the container sphere, the ray steps through nearly all possible densities of the particle distribution. Thus we get red and green colors as we march on, depending on the current position in the halo. The sum of these colors is used which will gives as a yellow color (the sum of red and green is yellow). This is what is happening here.
How can we still get what we want? The answer is to use a glowing halo instead of the emitting halo. The glowing halo is very similar to the emitting one except that it attenuates the light passing through. Thus the light of particles lying behind other particles will be attenuated by the particles in front.
For the results of the glowing halo see "The Glowing Halo".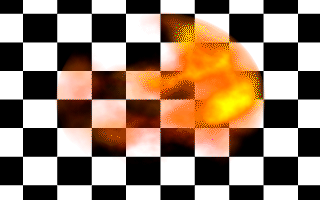
Adding some turbulence makes the fiery explosion more realistic.
Section 4.8.5.2.4
Resizing the Halo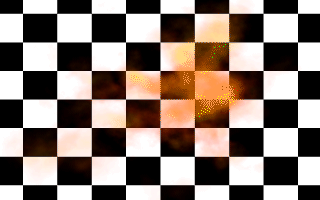
Resizing the halo makes it look much better.
Section 4.8.5.2.5
Using Frequency to Improve Realism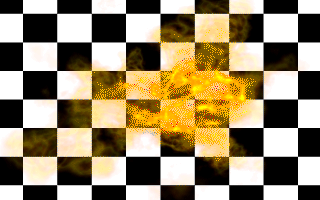
Using a periodic color map and a frequency of two gives a much nicer explosion.
Section 4.8.5.2.6
Changing the Halo Color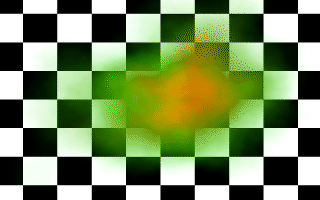
Using red and green colors gives an unexpected result.
Table Of Contents