When anti-aliasing is turned on, POV-Ray attempts to reduce the errors by shooting more than one viewing ray into each pixel and averaging the results to determine the pixel's apparent color. This technique is called super-sampling and can improve the appearance of the final image but it drastically increases the time required to render a scene since many more calculations have to be done.
POV-Ray gives you the option to use one of two alternate super-sampling methods. The Sampling_Method=n option or +AMn switch selects non-adaptive super-sampling (method 1) or adaptive super-sampling (method 2). Selecting one of those methods does not turn anti-aliasing on. This has to be done by using the +A command line switch or Antialias=on option.
In the default, non-adaptive method (+AM1), POV-Ray initially traces one ray per pixel. If the color of a pixel differs from its neighbors (to the left or above) by more than a threshold value then the pixel is super-sampled by shooting a given, fixed number of additional rays. The default threshold is 0.3 but it may be changed using the Antialias_Threshold=n.n option. When the switches are used, the threshold may optionally follow the +A. For example +A0.1 turns anti-aliasing on and sets the threshold to 0.1.
The threshold comparison is computed as follows. If r_1, g_1, b_1 and r_2, g_2, b_2 are the rgb components of two pixels then the difference between pixels is computed by
If this difference is greater than the threshold both pixels are super-sampled. The rgb values are in the range from 0.0 to 1.0 thus the most two pixels can differ is 3.0. If the anti-aliasing threshold is 0.0 then every pixel is super-sampled. If the threshold is 3.0 then no anti-aliasing is done. Lower threshold means more anti-aliasing and less speed. Use anti-aliasing for your final version of a picture, not the rough draft. The lower the contrast, the lower the threshold should be. Higher contrast pictures can get away with higher tolerance values. Good values seem to be around 0.2 to 0.4.
When using the non-adaptive method, the default number of super-samples is nine per pixel, located on a 3*3 grid. The Antialias_Depth=n option or +Rn switch controls the number of rows and columns of samples taken for a super-sampled pixel. For example +R4 would give 4*4=16 samples per pixel.
The second, adaptive super-sampling method starts by tracing four rays at the corners of each pixel. If the resulting colors differ more than the threshold amount additional samples will be taken. This is done recursively, i. e. the pixel is divided into four sub-pixels that are separately traced and tested for further subdivision. The advantage of this method is the reduced number of rays that have to be traced. Samples that are common among adjacent pixels and sub-pixels are stored and reused to avoid re-tracing of rays. The recursive character of this method makes it adaptive, i. e. the super-sampling concentrates on those parts of the pixel that are more likely to need super-sampling (see figure below).
The maximum number of subdivisions is specified by the Antialias_Depth=n option or +Rn switch. This is different from the non-adaptive method were the total number of super-samples is specified. A maximum number of n subdivisions results in a maximum number of samples per pixel that is given by the following table.
You should note that the maximum number of samples in the adaptive case is hardly ever reached for a given pixel. If the adaptive method is used with no anti-aliasing each pixel will be the average of the rays traced at its corners. In most cases a recursion level of three is sufficient.
Another way to reduce aliasing artifacts is to introduce noise into the sampling process. This is called jittering and works because the human visual system is much more forgiving to noise than it is to regular patterns. The location of the super-samples is jittered or wiggled a tiny amount when anti-aliasing is used. Jittering is used by default but it may be turned off with the Jitter=off option or -J switch. The amount of jittering can be set with the Jitter_Amount=n.n option. When using switches the jitter scale may be specified after the +J switch. For example +J0.5 uses half the normal jitter. The default amount of 1.0 is the maximum jitter which will insure that all super-samples remain inside the original pixel. Note that the jittering noise is random and non-repeatable so you should avoid using jitter in animation sequences as the anti-aliased pixels will vary and flicker annoyingly from frame to frame.
If anti-aliasing is not used one sample per pixel is taken regardless of the super-sampling method specified.
The overall syntax of a scene is a file that contains any number of the following items in any order.
See section "Language Directives", section "Objects", section "Camera", section "Atmospheric Effects" and section "Global Settings" for details.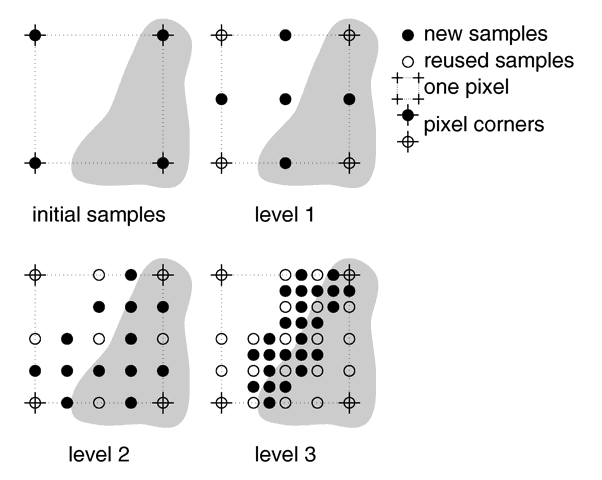
Example of how the adapative super-sampling works.
      Number of samples per    Maximum number of samples
      super-sampled pixel for  per super-sampled pixel for
 +Rn  the non-adaptive method  the adaptive method
  1                1                       9
  2                4                      25
  3                9                      81
  4               16                     289
  5               25                    1089
  6               36                    4225
  7               49                   16641
  8               64                   66049
  9               81                  263169
Section 7
Scene Description Language
Section 7.1
Language Basics
Table Of Contents